WindowsProgramMonitorService
WindowsProgramMonitorService
Topshelf
Nuget
1 | |
Main
1 | |
1 | |
1 | |
原文地址 shell-script-basics
The best thing about GNU/Linux is that it’s packed with utilities that improve productivity immensely. One such utility is a shell that can help accomplish complex tasks with just a few sequences of commands. Most of the time, users operate shell in an interactive way.
However, it becomes really productive when we leverage the scripting capabilities of the shell.
In this article, we are going to explore the basics of shell scripting, how simple echo command can be used in a shell script file, how to write comments, working with variables and conditionals.
Keeping it short and simple, let’s get started!
When we are working with shell scripts printing on the output screen is called echoing which can be done using echo.
1 | |
Let’s do this inside a shell script file. Follow the below steps:
.sh extension. Let’s say echo_script.sh.echo "Hello Shell", hit Save and open a terminal on the file location.$ bash echo_script.sh and hit enter, you should be able to see - Hello Shell.Comments are used to improve the readability of the script. Shell uses the pound # symbol for comments. A line beginning with the pound # symbol is ignored by the shell interpreter during execution.
The script given below shows the usage of the comment:
1 | |
Go to terminal and type - $ bash filename.sh (replace filename with whatever name you have given) and hit enter. You should be able to see - Hello Shell without printing anything given after the # symbol.
We can define variables to store information, which can be accessed within the shell script. There are certain rules we need to follow while defining variables:
By convention, shell variables are defined in the upper case. Given below is a simple script, which shows the usage of a variable within it:
1 | |
cat command is used to display the content of a file given after that. Try your hands on it.
So, we have a file hello.sh which contains a variable NAME which we used in the echo statement as $NAME that is after the $ symbol. Here we saw variable declaration and how inside double quotes a variable can be used.
If you hit - $ bash hello.sh and hit enter, you should be able to see - Hello CodeKaro on the terminal.
Like other programming languages, shell supports conditional expressions like – if, if-else and case. Let us understand this with simple examples:
if expression: In case we want to verify whether a file exists or not, we can use the if expression, as follows:1 | |
The script given above generates the following output when it is executed:
1 | |
if-else expression: Let us modify the above script to generate output when the file does not exist:1 | |
Type following and hit enter:
1 | |
case statement: Shell provides a switch statement-like functionality using the case statement. Let us understand this with the example given below:1 | |
The script given above generates the following output when it is executed:
1 | |
1 | |
1 | |
In the case statement, an asterisk (*) denotes a default case.
Well, that’s it from me.
We covered printing, variables, comments and conditionals, not too much, right?
++ your GitHub Profile README? Check out Quote - READMETill next time!
Namaste 🙏
Image Credits - pch.vector
Support the author by donating an amount of your choice.
wsa
Windows Subsystem for Android™️
笔记本一直在Windows insider 通道,早早就更了Win11, 主要是UI和功能菜单变化较多,没什么实质性的变化(目前版本已经比较稳定,非主力机可以尝鲜)。微软六月的发布会说会支持原生Android应用,算是比较感兴趣的点,演示时用的却是PWA版本的东西(印象中是这样),终于本周可以使用了。
做最好的linux发行版wsl,做最好的android发行版wsa. – Microsoft🐶
必要条件
Hyper-V 虚拟机平台 功能(”应用” -> “可选功能” -> “更多 Windows 功能” => 勾选 “Hyper-V” 和 “虚拟机平台”)windows store可以正常使用的,建议将地区设为美国,可直接在商店下载
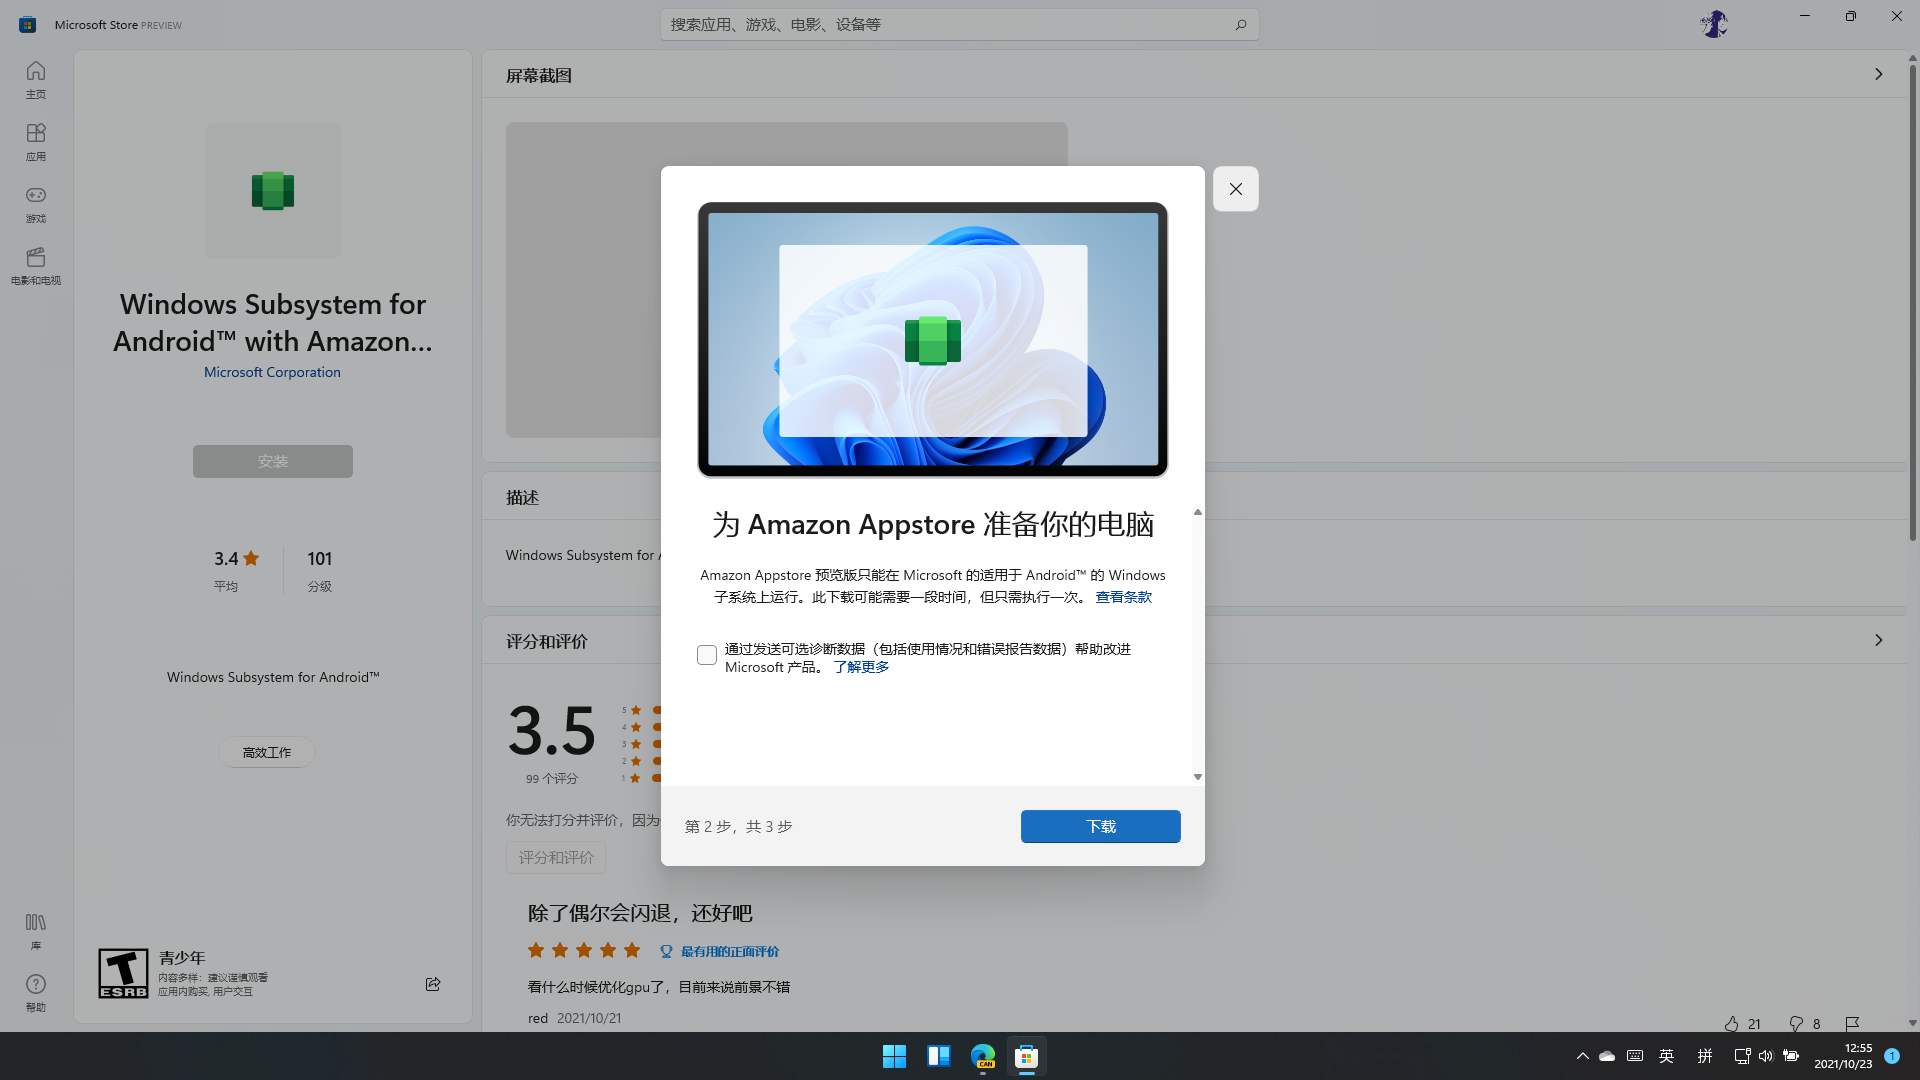
安装wsa
1 | |
打开是Windows Subsystem for Android™安装即可
安装Amazon store(可选,用与下载APP)
本人测试,Amazon 国区账号登陆成功但是显示当前地区不支持,美区账号登陆不上,所以直接用adb 装了一个酷安使用了
1 | |

商店不能使用的可以从store.rg-adguard.net通过productid搜索下载Msixbundle包手动安装(也可使用add-Appxpackage 命令安装)。
安装adb
Android Debug Bridge (adb)
a versatile command-line tool that lets you communicate with a device.
简单理解为andord的一个命令行调试工具即可
下载后解压至一个目录即可,如果要全局使用可设为环境变量。
adb的几个命令
version 显示版本信息connect 连接设备disconnect 取消链接设备devices 查看已连接设备install 安装apk起来命令可以看下google文档
连接设备
首先要将开发者模式打开,同时记下端口号,默认应该都是58526
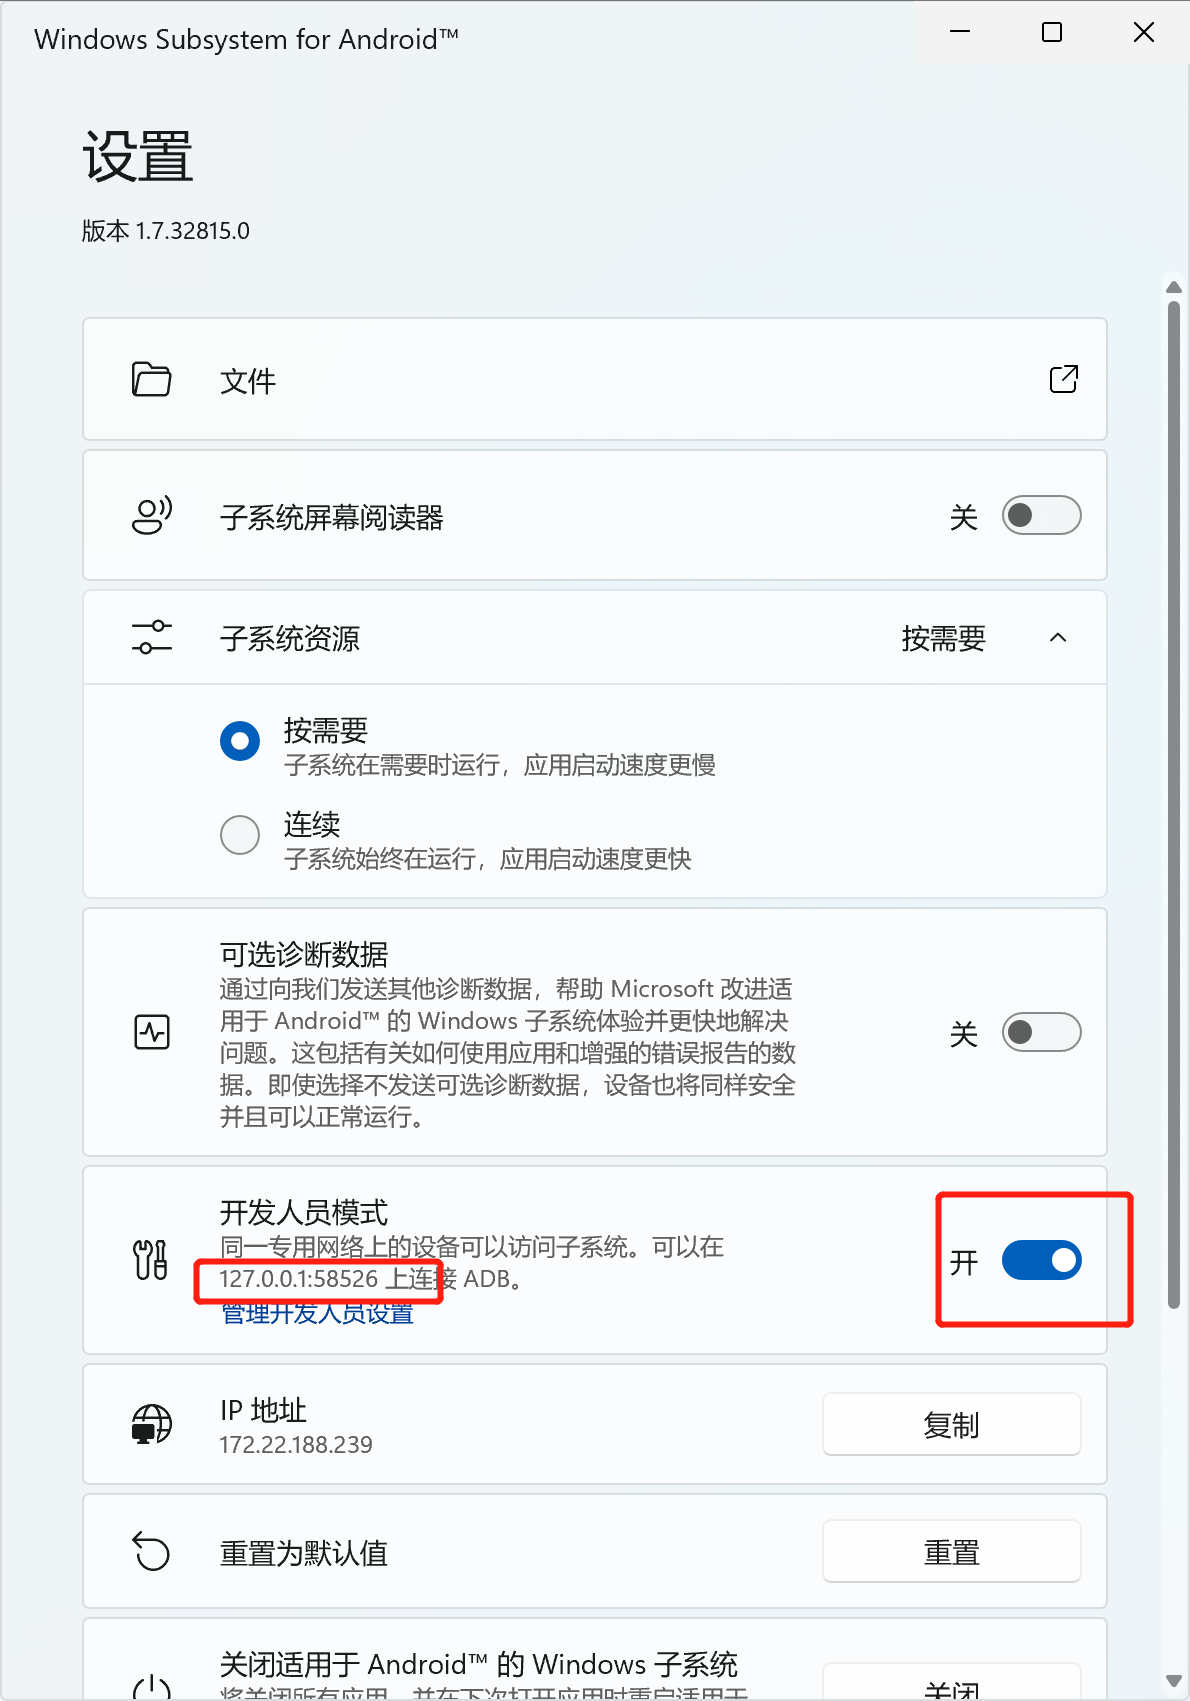
执行命令
1 | |
安装应用
需要apk文件,建议官网下载,或者酷安
1 | |
试用
IT之家,maui app, bilibili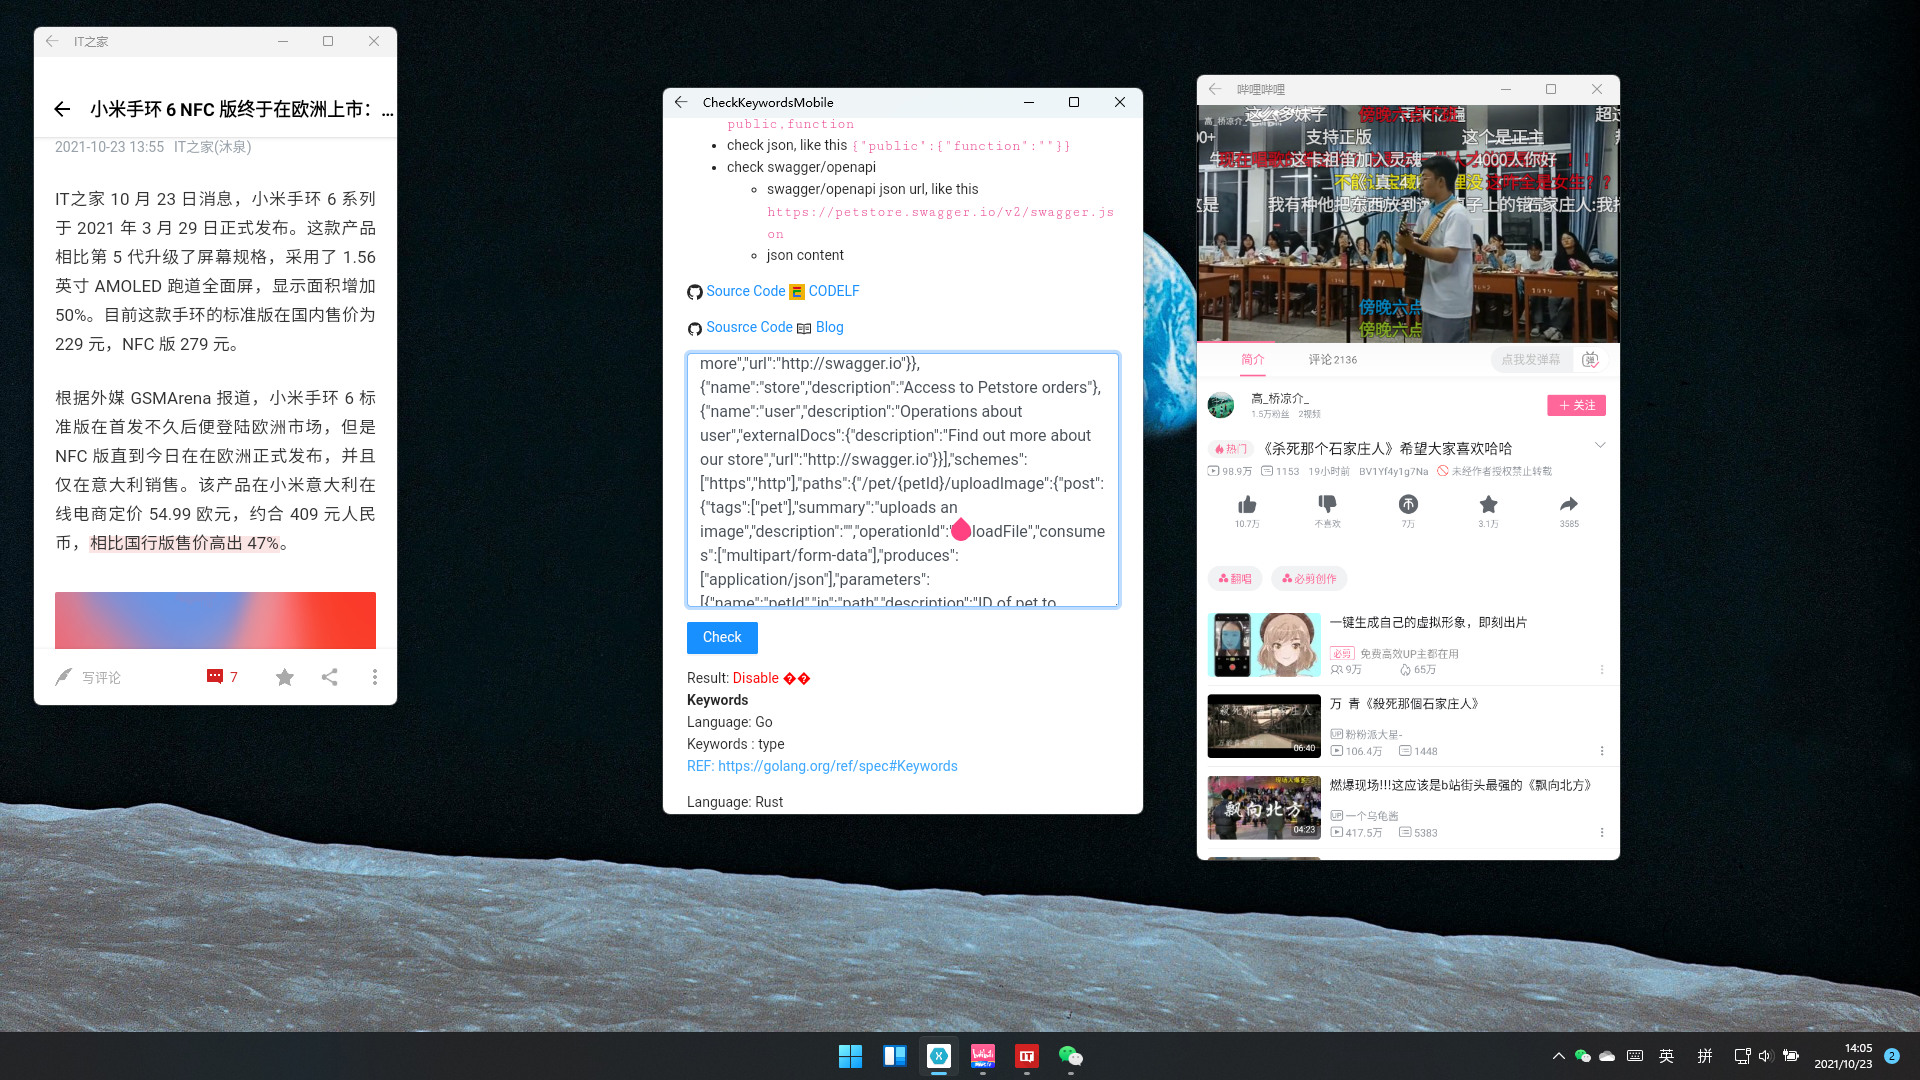
新浪微博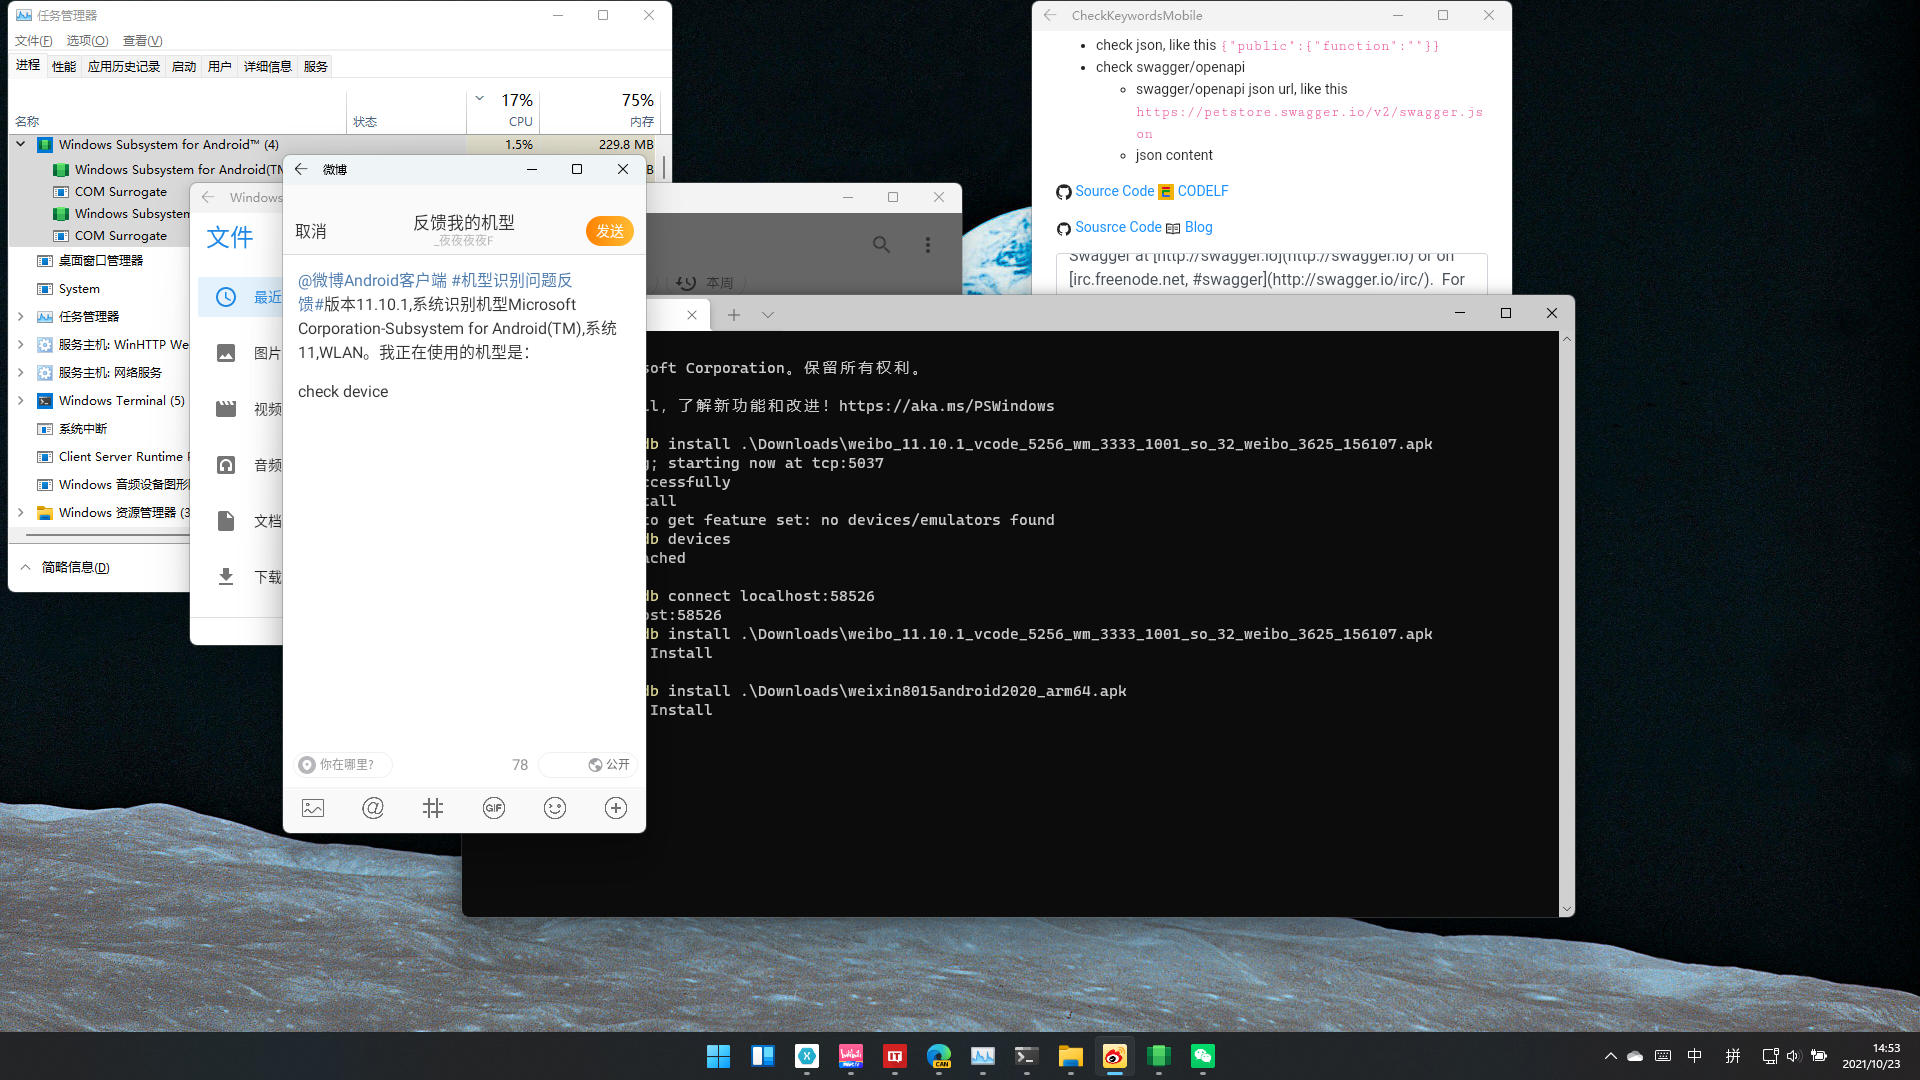
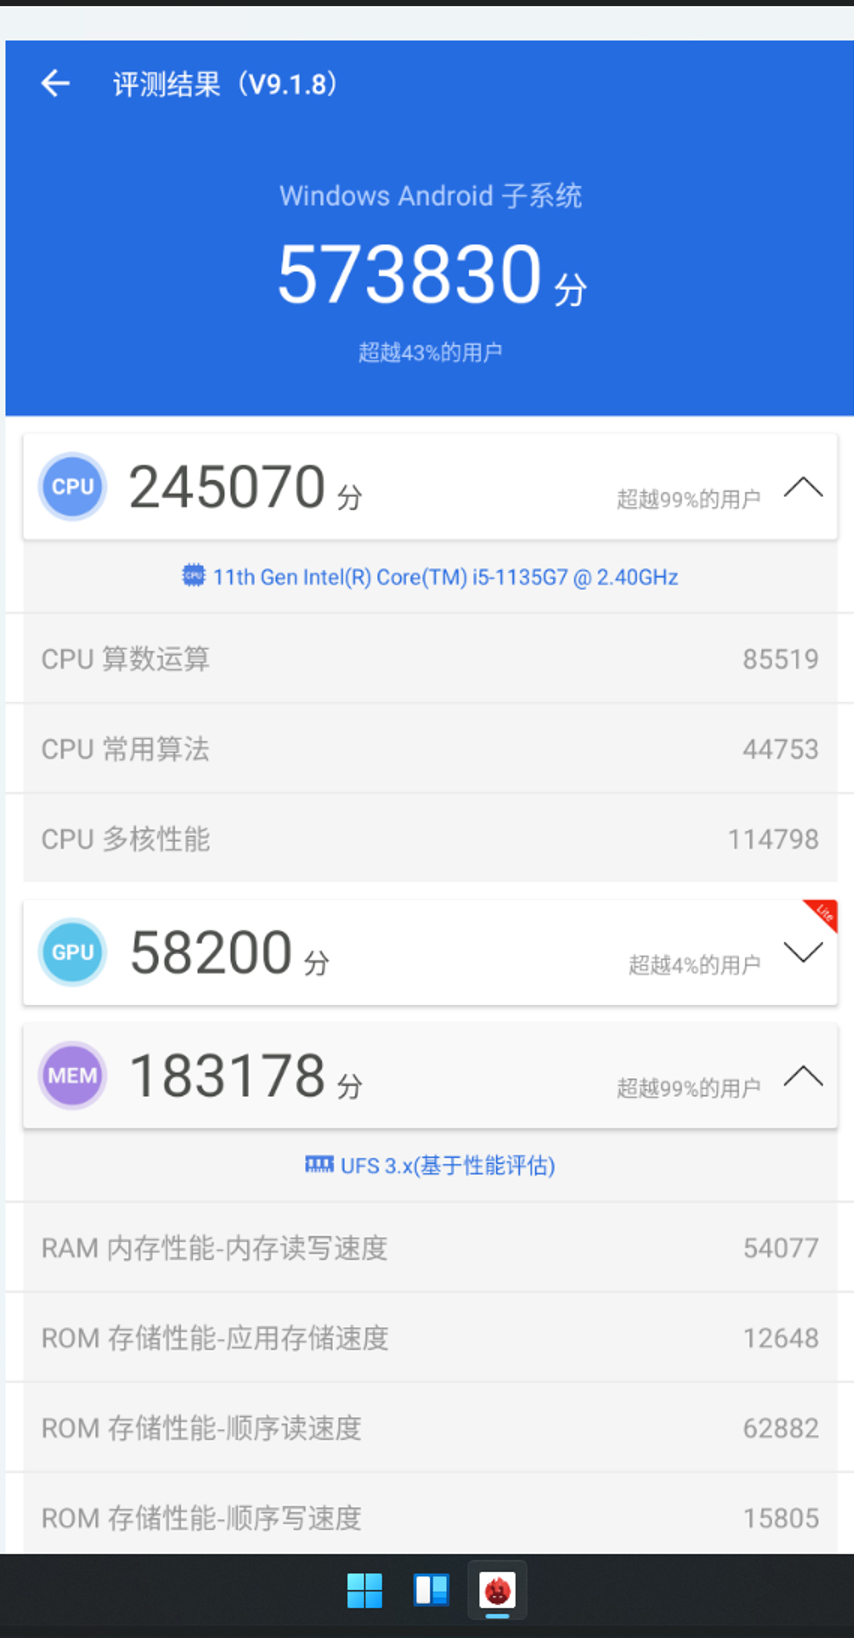
安兔兔
使用中可能会有一些问题,可以参考下酷安老哥的整理有没有解决方案
1024 2021

阅读时间 2020.12.1 ~ 2021.4.30
| sort | name | protocols |
|---|---|---|
| 7 | 应用层 | TELNET,SSHMHTTP,SMTP,POP,SSL/TLS,FTP,MIME,HTML,SNMP,MIB,SIP,RTP |
| 6 | 表示层 | 🔼 |
| 5 | 会话层 | 🔼 |
| 4 | 传输层 | TCP,UDP,UDP-LITE,SCTP,DCCP |
| 3 | 网络层 | ARP,IPv4,IPv6,ICMP,IPsec |
| 2 | 数据链路层 | 以太网、无线LAN、PPP……(双绞线电缆、无线、光纤) |
| 1 | 物理层 | 🔼 |
TCP/IP 地址标识
TCP/IP 协议群
| OSI 参考模型 | TCP/IP 分层模型 |
|---|---|
| 应用层 | 应用层(DNS,URI,HTML,HTTP,TLS/SSL,SMTP,POP,IMAP,MIME,TELNET,SSH,FTP,SNMP,MIB,SIP,RTP,LDAP) |
| 表示层 | 🔼 |
| 会话层 | 🔼 |
| 传输层 | 传输层(TCP,UDP,UDP-LITE,SCTP,DCCP) |
| 网络层 | 互联网层(ARP,IP,ICMP) |
| 数据链路层 | 网卡层 |
| 物理层 | 硬件 |
跨越网络传送数据包,使整个互联网都能收到数据的协议
IP 数据包在发送途中一旦发生异常导致无法到达对端目标地址时,需要给发送端发送一个平常的通知,也可以用来诊断网络。
从分组数据包的 IP地址 解析出物理地址(MAC地址)的一种协议
浏览器与服务端之间通信所用的协议是 HTTP(HyperText Transfer Protocol)
数据主要格式 HTML(HyperText Markup Language)
HTTP 属于 OSI 应用层协议
HTML 属于 表示层协议
FTP (File Transfer Protocol)
我以为的 MAUI hot reload
我跑出来的,哎,可以看到,完全是重新生成DLL,重新安装的
为什么会这样呢?看devblog,8号发布了[.NET 6 Preview 3][Announcing .NET 6 Preview 3],9号发布了 [MAUI Preview 3][Announcing .NET Multi-platform App UI Preview 3],之前就看了Scott的视频,想试下这么顺滑的mobile hot reload,虽然没有成功(原因下边会讲),但也把相关项目跑了一下,了解一下最新进展。
MAUI: Multi-platform App UI 嗯就是字面的意思,支持多平台的APP(Windows、MacOS、Android 和 IOS)
- MVVM:Model-View-ViewModel 就是 XAML 的模式
- MVU:Model-View-Update (上图的演示热更新就是用的这个模式)
这是一个支持安装和配置 maui 的工具(包括.NET 6,Android ,IOS 的SDK 以及MAUI项目模板),不知道配置的SDK包地址是否有问题,我这边安装很慢,直接手动安装了,不想手动安装的可以试下这个工具
安装: dotnet tool install -g redth.net.maui.check
运行: maui-check --dev
或者手动安装(.NET 6SDK是必装的,其他的根据需求安装即可)
.NET 6 SDK(这个官网下载也可以)
Android
iOS
Mac (Cocoa/AppKit):
Mac Catalyst (UIKit):
WinUI3
安装好需要的环境后,即可开始项目
创建MAUI项目
1 | |
指定nuget包源
因为还是预览版,所以nuget源需要单独指定下,在项目根目录下创建一个 nuget.config 文件,输入以下内容保存
1 | |
restore
此时的项目结构
1 | |
如过只使用某个项目,可以修改csproj中的TargetFrameworks
1 | |
还原包
1 | |
运行
需要先启用模拟器,如果是windows调试ios项目,需要先进行ios配对(可以参考 进行调试)
不同项目,对应命令
1 | |
MVU 根据模板生成的Android项目,会有一个错误的引用
1 | |
相关issue
wiki
Currently the best experience is on macOS with VS Code and building for iOS.
TL;DR
本文为面试遇到启动顺序问题,先上结论,感兴趣可以往下看(会简单聊下源码,对比下 .NET Core 各个版本的区别)
结果是很容易得出,dotnet new webapi, 然后对应位置console下就好了,但是为什么如此呢?
如果根据结果去推原因,并不是一个好的方法,你会用各种不知对错的想法去对应结果(不只是代码,人生也是如果 就如各种畅销书/垃圾水文,根据人的成功,去证明人的各种小习惯的重要性)。所以本文试图通过两个方式探究下原因。
1 | |
1 | |
与 1.0 一致
与 1.0 一致
1 | |
嗯,2.0的时候已经清爽了不少,把那些默认的中间件的使用都放在了 CreateDefaultBuilder 中,我们来看下这个方法做了哪些事情(代码在下边),可以看到UseKestrel,UseIIS都是在这个方法中实现的。并且把 .NET Core 1 中Startup做的config部分工作放在了这里,还有log部分,也是在此实现。
1 | |
1 | |
因为在main函数中就把config配置好了,所以Startup的ctor参数也从 IHostingEnvironment -> IConfiguration, 从这之后基本就没有太大的变动了
BTW 常看报文的肯定经常看到这个 Server: Kestrel , 有心的人估计也查过这个,知道这个是与 Nginx,IIS,Apache一样的,用来负载你的web程序,但是有一大部分人都说自己在程序中并没用用过这个,部署的时候也一直是 nignx,IIS, 实际上是微软已经默认使用了。
1 | |
换了下函数的返回值 IWebHost -> IWebHostBuilder
1 | |
SetCompatibilityVersion 看名字也知道是为了兼容性,不用管
多了一个HSTS 的中间件(为了强制使用HTTPS),估计是 RFC 有啥新出条例,所以项目默认支持UseHttpsRedirection 一样是为了安全
这一版基本没什么变化
无变化
基本无变化
1 | |
IWebHostBuilder -> IHostBuilder 这样可以更好的将 ASP.NET Core 应用与非 Web 特定的其他服务器方案集成 ,通过 Hosting Exception, create default build, config web host default 启用 API 。
这一部分更多是,微软对于 .NET Core 代码类库的变化,整体的封装都做了很大的调整(v2 的时候出了Microsoft.AspNetCore.All,基本引入的所有的必需包,当然会导致用不到的包也引入了,项目加载必然会慢一点,V3的时候做了调整 )
1 | |
这次是将 AddMvc -> AddControllers, 即默认的注入变为Controll,不再包括视图(view,page),也是因为这个变化,可以看到下边多了一些中间件的注入(route,authorization,endpoint)。
为什么这个时候多出了这些呢? 如果看下之前代码,会发现的UseMvc()中route,authorization,endpoint这些东西实际上在MVC中都有实现。
可以说这次的更新,微软更多的是把默认配置变得更轻巧,灵活一点。(当然之前的useMvc也是可以正常用的,注意 微软只是改的默认写法,而不是规定你必须这样做)
无变化
无变化
PS. 从这一代,webapi项目默认集成了OpenAPI(Swagger)
无变化
无变化
先把相关的方法都加上
1 | |
ConfigureWebHostDefaults
ConfigureHostConfiguration
ConfigureAppConfiguration
Startup
Startup.ConfigureServices
ConfigureLogging
ConfigureServices
service:3226198
service2:29035785
Startup.Configure
嗯,是2.0了,1.0指路👉 CheckKeywords:校验你的接口参数中是否使用了其他语言的关键字/保留字
本次更新内容
最近在看 《架构整洁之道》 ,书中举一些例子时会有 UML 类图,个人对于 UML 类图记得不是很清晰,所以理解起来不是很方便,准备再总结下。总结时发现对于 组合/聚合/关联 之间的差异有点不太理解,查了一些相关说明的文章,发现这篇写的比较好,但是没有中文,所以自己翻译了一下,哪块翻译的有问题欢迎在评论区批评指正。
ps 也有结合 mermaid 的使用写了一篇UML类图的总结,有兴趣的可以看下 UML Mermaid .
为加强记忆,对于关键词,中文和英文会同时列出
原文地址:visual-paradigm.com
| 继承 | Inheritance | classA --|> classB : Inheritance | |
| 组合 | Composition | classA --* classB : Composition | |
| 聚合 | Aggregation | classA --o classB : Aggregation | |
| 关联 | Association | classA --> classB : Association | |
| 依赖 | Dependency | classA ..> classB : Dependency | |
| 实现 | Realization | classA ..|> classB : Realization |